• TECH MANTRA

Enjoy a fast, responsive and cost effective Remote IT Support service to solve your IT issues quickly and with the minimum of fuss.Focused on building innovative solutions that create value for businesses and consumers. Our solutions are built around the following three founding principles - Unique Technology; Distinctive Information / Content; and Innovative Services. Our solutions combine these three, leverage our global services delivery capabilities and ensure that we are able to provide unmatched, superior resolution to specific customer problems.


Techmantra
Showing posts with label windows issues. Show all posts

Monday, 3 July 2023

0x00000709 How to Fix “Operation could not be completed error” Error When Installing Shared Printer? Windows 11 22h2

 0x00000709 How to Fix “Operation could not be completed error” Error When Using Shared Printer? Windows 11 22h2


1. Via Group Policy

Press +R to open the Run prompt.

Type gpedit.msc and hit the Enter button.


  • Go to Computer Configuration > Administrative Templates > Printers
  • Double-click on the Configure RPC connection settings on the right-hand side.
  • Select the Enabled option.
  • Expand the Protocol to use for outgoing RPC connections drop-down list.
  • Choose either RPC over TCP or RPC over named pipes option.
  • Click the OK button.
  • Press +R to open the Run prompt.
  • Type gpupdate /force and hit the Enter button.


2. Via Registry

  • Press +R to open the Run prompt.
  • Type regedit and click the OK button.
  • Click on the Yes option.
  • Navigate to this path: HKEY_LOCAL_MACHINE\SOFTWARE\Policies\Microsoft\Windows NT
  • Right-click on Windows NT > New > Key and name it Printers.
  • Right-click on Printers > New >Key and set the name as RPC.
  • Right-click on RPC > New > DWORD (32-bit) Value.
  • Name it as RpcAuthentication.
  • Create another REG_DWORD value named RpcUseNamedPipeProtocol.
  • Double-click on it to set the Value data as 1 to select the Named Pipes.
  • Click the OK button.


Saturday, 7 July 2018

Windows Safe Mode (Windows 10, 8)

Safe Mode- Safe Mode is a diagnostic mode that allows you to use Windows with basic drivers. If you encounter errors or software problems in Windows, restarting in Safe Mode allows you to continue working and troubleshoot the problem. The Safe Mode feature does not install any software.
In Safe Mode, Windows might look different because Safe Mode uses a low graphics mode for the display. Also, the words Safe Mode display in the four corners of the screen.
  •       ENTERING SAFE MODE FROM WINDOWS 10


1.     Click Start, and then click Settings.
2.     Click Update & security.
3.     Click Recovery, and then under advanced startup, click Restart now.
4.     The Choose an option screen opens. From the Choose an option screen, click Troubleshoot.
5.     Click advanced options.
7.   Click Startup Settings.
8.   Click Restart.
9.   Choose the safe mode option you want from the Startup Settings menu

  •   ENTERING SAFE MODE FROM COMMAND LINE


1. Enable Safe Mode - Type:
    bcdedit /set {default} safeboot minimal and press Enter.
2. Enable Safe Mode with Networking - Type:
    bcdedit /set {default} safeboot network and press Enter.
3. Enable Safe Mode with Command Prompt - Type:
    bcdedit /set {default} safeboot minimal and press Enter:
    bcdedit /set {default} safebootalternateshell yes and press Enter.

To exit from Safe mode type the following command and press Enter

bcdedit /deletevalue {default} safeboot and press Enter


  • USE THE SYSTEM CONFIGURATION TOOL (MSCONFIG.EXE)

  1.  Open Run Window (Simultaneously Pressing Window + R keys on Keyboard) and   type msconfig
  2.   In the System Configuration window, click or tap the Boot tab. In the Boot options section, select the “Safe boot” option. Finally, click or tap on OK
  3. Restart your computer.

  • USE THE “SHIFT + RESTART” COMBINATION

1.     Open the Start menu and click or tap on the Power button.
2.     While keeping the Shift key pressed, click or tap on Restart.

Monday, 14 August 2017

How to turn off Windows Update in Windows 10

If you face slowdown of computer due to updates downloading and installing in the background, the following tips will help you to turn off Windows updates in Windows 10

OPTION 1  SET AS METERED CONNECTION

Setting your network connection to ‘Metered’, stops Windows 10 from automatically downloading the Updates. 

Settings app > Network & Internet > WiFi > Advanced options. Move slider to On position for 
Set as metered connection.


OPTION 2  DISABLING WINDOWS UPDATE SERVICE


By disabling the windows update service you can also disable Automatic Updates from Microsoft.

Control Panel  >  All Control Panel Items > Administrative Tools >  Services.

Find windows update service from the list > Right Click on the service > Properties >  Startup Type > Select Disabled.

note: you will have to go to the Services and turn it on once in a while to download and update your copy of Windows.


OPTION 3  GROUP POLICY


Run > gpedit and navigate to the following policy setting:


Computer Configuration > Administrative Templates > Windows Components > Windows Update.
On the right-side, double-click on Configure Automatic Updates and change it to disabled


Friday, 11 August 2017

Best Way to Clean Windows 10

Lets Clean Useless Files


DISK CLEANUP

The Disk Cleanup utility is part of Windows. You can access it by typing Disk Cleanup into the
Start Menu (OR type CLEANMGR on the run command) .It will immediately scan for files it can delete and display a list to you.You might want to hold off on cleaning the Windows ESD installation files option though. Removing this saves space, but you won’t be able to reset your computer using the PC Refresh feature without Windows 10 installation media.


CCleaner

This trusted utility cleans many more applications than the built-in Windows tool. CCleaner allows you to clean up more Windows files than Disk Cleanup.You’re also able to clean up files for installed apps, such as Chrome and Firefox, media players, and Office applications. Use the Analyze button to find out how much space each category is taking up. Choose Clean when you’re ready to delete those files. CCleaner also has an option for cleaning the registry. Don’t do this. Even a trusted registry cleaner like CCleaner is useless at best, as removing hundreds of registry “errors” won’t improve performance at all, and you’re more likely to break something with the excess cleaning than help anything.


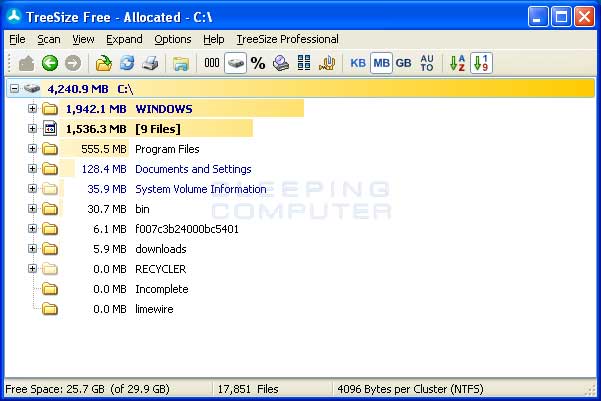
TreeSize Free

TreeSize Free can help you identify the folders that take up the most space on your system.Open up TreeSize and click Scan on the top bar. You can choose your entire C: drive (which is a good idea) or scan a particular folder.Massive installations like Adobe

creative products, as well as games, are likely to show up here. Have a look to see which apps are taking up the most space.


Clean Bloatware


To remove pre-installed bloatware. Whether “recommended” Windows 10 Modern apps or

manufacturer-installed junk, removing this is a great step anytime you install Windows or take a big cleaning run. Use the PC Decrapifier to uninstall manufacturer crapware.


Tuesday, 22 December 2015

Windows 10 common issues and fixes


  • CD/DVD DRIVE NOT DETECTED AFTER UPGRADE TO WINDOWS 10
  • Resolution: Create a registry subkey (:Note To use this method, you must be logged on to Windows as an administrator.) ! Important Follow the steps in this section carefully. Serious problems might occur if you modify the registry incorrectly. Before you modify it, back up the registry for restoration in case problems occur.
    To create the registry subkey, follow these steps:

    Press the Windows logo key + R to open the Run box. (or right-click on windows icon in lower left corner) Type regedit in the Run box, then press Enter. If you are prompted for an administrator password or for a confirmation, type the password, or click Allow In the navigation pane, locate the following registry subkey:
    HKEY_LOCAL_MACHINE\SYSTEM\CurrentControlSet\Services\atapi Right-click atapi, point to New, then click Key. Type Controller0, and then press Enter. Right-click Controller0, point to New, and then click DWORD(32-bit) Value . Type EnumDevice1, and then press Enter. Right-click EnumDevice1, click Modify.... Type 1 in the Value data box, and then click OK. Exit Registry Editor.


  • WINDOWS STORE NOT OPENING

  • Windows App Store is not opening, loading or working, and it endlessly makes you wait with a full screen bag and a loading animation? Well, there are few simple solutions you want to try to fix this problem.

    1]. Adjust your date and time settings.

    2]. Run the Windows 8 Apps Troubleshooter

    Download and Run the Fix. It automatically fixes some of the basic issues that might be preventing your Store or apps from running – such as lower screen resolution, incorrect security or account settings, etc. You can download Windows 8 App Troubleshooter from here. It’s a Troubleshooting Pack Cabinet file.

    3].Clear Windows store cache

    Press Windows key + R to open run box.
    Type WSReset.exe and hit enter.
    By doing this, all store cache and corrupt settings are reset and your Windows store shall open normally.


  • FIXING WINDOWS 10 APPS WON'T LAUNCH OR HANGS

  • If you've installed Windows 10 Build 9926 and find that some apps work and some apps don't, the fix could be as easy as registering the apps. In particular, some early testers have found that apps like Cortana, the beta Store, and others either won't launch at all, or start to launch but hang

    Run this command in Powershell window

    Get-AppXPackage -AllUsers | Foreach {Add-AppxPackage -DisableDevelopmentMode -Register "$($_.InstallLocation)\AppXManifest.xml"}

  • ROLLBACK FROM WINDOWS 10 TO THE PREVIOUS VERSION OF WINDOWS
  • You have one month to go back to Windows 7 or Windows 8.1 after installing Windows 10. So make sure you make up your mind before the option disappears.

    1].To roll back your Windows 10, go to your PC Settings, by typing Settings in the taskbar search bar, next to the Windows icon, and clicking on Settings. It will open the PC Settings. Select ‘Update and Security’.

    2].The Update and Security option opens. Here you will see options like Windows Update, Activation, Backup, Recovery and Windows Defender. Click on ‘Recovery‘.


    Click on ‘Go back to previous version of Windows’. In this case you see Go back to Windows 8.1.Microsoft will then ask for your feedback and the reason to uninstall Windows 10.
    _______________________________________________________________________________

    Popular Posts

    0x00000709 How to Fix “Operation could not be completed error” Error When Installing Shared Printer? Windows 11 22h2

      0x00000709 How to Fix “Operation could not be completed error” Error When Using Shared Printer? Windows 11 22h2 1. Via Group Policy Press ...

    Popular Posts

    Search This Blog

    About

    Enjoy a fast, responsive and cost effective Remote IT Support service to solve your IT issues quickly and with the minimum of fuss.Focused on building innovative solutions that create value for businesses and consumers. Our solutions are built around the following three founding principles - Unique Technology; Distinctive Information / Content; and Innovative Services. Our solutions combine these three, leverage our global services delivery capabilities and ensure that we are able to provide unmatched, superior resolution to specific customer problems.